
Choose clear, recent photos that you recognize as yourself. You do not need a studio session or a set of suit photos before getting started. You also do not need several crops of your favorite selfie to fill the upload slots.
Realistic AI Headshots currently accepts 4–10 source photos, with 8 recommended. These are our product's requirements; other services may differ. Use this guide to choose a suitable set from your camera roll, then check the photo requirements and examples.
A quick photo selection checklist
| Check | Prefer | Replace |
|---|---|---|
| Person | Just you, with an easily recognizable face | Cropped group photos or other faces in the frame |
| Clarity | Eyes, nose, and mouth remain clear when enlarged | Missed focus, motion blur, or heavily compressed copies |
| Now | Photos that represent your current hair, facial hair, and overall appearance | Old photos that look noticeably different from you now |
| Variety | Front-facing views and gentle turns, with different outfits or settings | Near-identical frames from one burst |
| Face | Eyes and most of your face are visible | Sunglasses, masks, hands, or hair covering your face |
| Editing | Photos that preserve your facial features | Face reshaping filters or headshots made by another AI tool |
A beautiful travel photo is not automatically a useful source photo. If your face is tiny in the landscape, choose a closer view as a main photo in your set.
How to put together eight varied photos
Start with one clear, front-facing photo you like. Add other photos one at a time, asking: does this show a different view, and can I still see my face clearly?
One possible mix is:
- Three front-facing photos: relaxed expressions and natural smiles, preferably from different moments.
- Three photos with gentle turns: include both directions, avoiding extreme profiles or steep camera angles.
- Two slightly wider, upper-body photos: keep your face clear while adding another outfit or setting.
This is an organizing suggestion, not a required ratio or a guarantee of better results. If you have four suitable photos, review them against the upload requirements. Do not add blurry or duplicate images just to reach eight.
Can you use selfies? Do you need to wear a suit?
You can choose from clear everyday selfies. The purpose of a source photo is to show what you look like now; it does not have to resemble a finished professional portrait.
Check whether the phone was very close to your face, the camera was pointing sharply upward, or your hair or hand covered your eyes. Prefer a natural viewing distance and angle, with your face clearly visible.
Your source photos do not all need to show a suit. In our product, a look pairs one outfit with one background. Choosing source photos and choosing professional looks are separate steps. Prepare your everyday photos first, then consider how you want to appear on LinkedIn, your website, or a company bio. See pricing and what your first shoot includes.
Common photos to replace
Near-identical bursts and crops
Cropping one photo into a wide shot, an upper-body shot, and a close-up does not add a new camera angle. Keep the clearest version and find another photo taken at a different moment.
Heavy beauty filters and AI-generated headshots
If a filter enlarges your eyes, narrows your nose, or changes your jawline, that image is not a useful reference for the features you want to preserve. Do not substitute a headshot from another AI tool for a source photo of yourself.
Dark, overexposed, or obstructed faces
Check whether you can distinguish your eyes, nose, and mouth. If backlighting, deep shadows, or bright highlights hide them, choosing a clearer photo is more useful than applying another filter.
Old photos with a substantially different appearance
Build the set around the appearance you want to represent now. Avoid mixing childhood photos, a much older facial-hair style, and current portraits. “Recent” means representative of your current appearance; there is no need to impose the same age cutoff on everyone's photos.
How to take a few more source photos
If your camera roll does not contain enough suitable photos, use your phone to add a few simple ones:
- Find a position with even light across your face. Check the screen for large shadows or very bright patches.
- Clean the lens, turn off face reshaping filters, and make sure your face is in focus.
- Keep the camera roughly at eye level. Show your full face without holding the phone extremely close.
- Take a front-facing photo, then turn slightly in each direction. Try another background or everyday outfit.
- Enlarge the photos to check clarity. Keep varied, clear frames and remove blurry or nearly identical candidates.
You do not need to recreate a professional shoot. The task here is to show yourself clearly; choosing the finished outfit and background comes later.
What to look for in generated examples
Compare the overall facial features in the source photo and result, then inspect hair, collars, clothing, and backgrounds. A small thumbnail alone is not enough to judge every result.
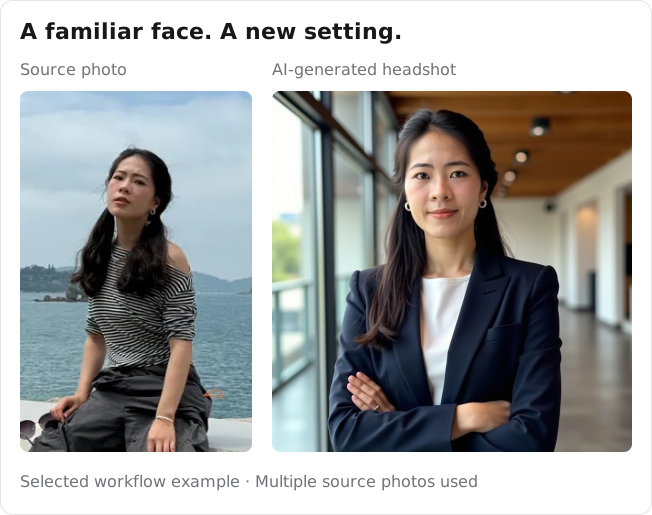
This is a recorded, selected example from a past workflow. It illustrates the change from a source photo to a professional portrait. Only one source photo is shown, but multiple source photos were used. It is neither a complete upload set to copy nor a complete first-order delivery. Individual results vary.
Explore the same-person comparisons and photo details on our homepage. For a specific use case, see our LinkedIn headshot styling guidance.
Before you upload
- Your set contains 4–10 photos, all of the same person.
- Your face and main features are clear.
- The photos represent your current appearance without face reshaping filters.
- The set includes different angles, outfits, or settings, rather than repeated crops.
- You have not used sunglasses photos, cropped group shots, or AI-generated portraits to fill the slots.
Next, compare your choices with the photo requirements, then review the looks, photo count, and refund terms for your first shoot. The photo guide is free to read. It provides preparation advice; it does not automatically check photos or generate headshots.